Will you be my....
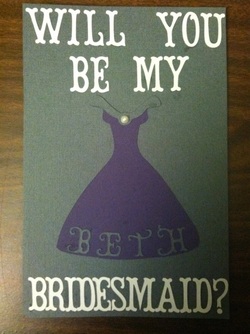
My first DIY Project was these cards to ask my girls to be in the WP. On the back I printed a poem I found online somewhere that goes like this:
The day, the dress
The bride, the groom
The joy, the tears
Will all come so soon
Professing true love
To my husband-to-be
With family and friends
All watching me
I hope the sun will
Be shining down
Keep your fingers crossed
That I’ll fit my gown
But there ‘s one more thing
That there needs to be
And that’s to have you
Standing with me!
Silk Flower Pomanders
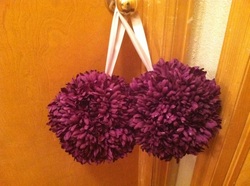
I made these pomanders to use as decoration along the aisle during the ceremony as well as the hang from the altar. I used 4" styrofoam balls and silk flowers from Michael's. I first stuck wire into the ball to make a loop so that I had somewhere to attach the ribbon. Then I trimmed the flowers and just stuck them into the ball, making sure to space them out so the ball was full. Each ball needed about 25-30 stems and cost me about $15 dollars per ball. It wasn't the cheapest DIY project but I love the way they look and it was a lot cheaper than using real flowers.
Photo Frame Card Box
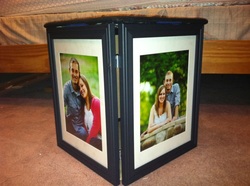
This is my finished card box. It was pretty simple to make, just time consuming. I found the idea and directions at http://roadtotheaisle.blogspot.com/2007/09/diy-photo-frame-cardbox.html. The only thing I did different was that I used 1" narrow hinges instead of L-brackets to attach the frames. This way, the hinges wouldn't hang over the edge of the frame, making it easy for me to put the pictures in once the box was assembled.
Monogram
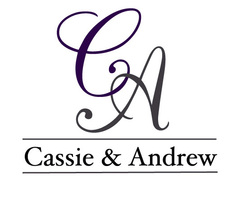
I made this monogram in our wedding colors using Photoshop. I got the tutorial from http://weddingmonograms.blogspot.com/2008/01/twined-initial-monograam-tutorial.html.
Bridesmaid Buttons
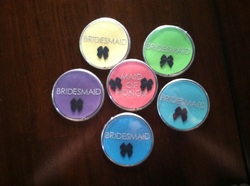
Sorry that they are kind of hard to see. But these are buttons I made for my girls in the WP. They were my sister's (MOH) idea and I thought they were cute. They were really cheap and simple but I think they're cute.
Monogrammed Aisle Runner
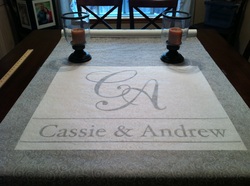
I decided that I really like the look of a monogrammed aisle runner but I was not about to pay to have a custom one made. I figured I could tackle it myself and after consulting the "Road to the Aisle" blog, I decided to go for it. It was a little bit more of a time consuming project than I like to take on (I'm not the most patient person) but I love the end result. I bought the aisle runner at Michael's with a 40% off coupon, as well as the acrylic paint and paintbrushes. I took our monogram (designed in Photoshop) to Kinko's and had it enlarged to 28" wide. I started off by taping my monogram to the table and then laying the aisle runner over it and positioning it so that the monogram was centered and started 1.5 feet from the bottom of the runner. I then traced the monogram onto the runner using pencil. The picture shows the runner taped over the monogram before I traced it.
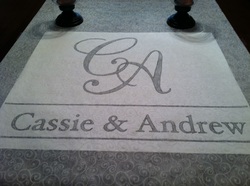
Here is a picture of the monogram all traced. Hard to really tell but just to show the steps.
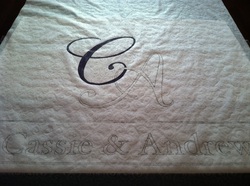
Next I removed the monogram from under the runner and replaced it with wax paper. This was to ensure that when I painted the monogram, the runner wouldn't stick to anything and would make for easy removal. Just make sure that the waxy side is facing up, otherwise you will end up with a mess. I painted the monogram in steps because I used 3 different colors (It's hard to tell from the picture but the C is dark purple, the A is Gray, and the names are black). This picture shows it after the C was painted. I didn't take pictures of the rest of the steps, but I made sure to wait about 2-3 hours before I went on to the next color. I just wanted to be safe. I took my time painting everything so that it was clean.
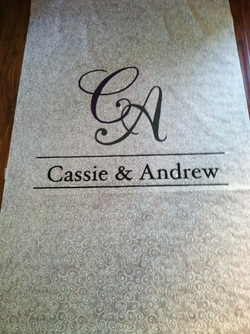
Total (not including drying time) this took me about 9 hours. I'm a perfectionist so it took me a while but I would say that this would take about 6 hours, at least, for anyone to do. It was very tedious and time consuming, but definitely worth the end result.
My Something Blue
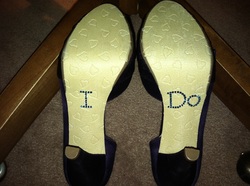
I decided to put "I do" in blue rhinestones on the bottom of my shoes for my something blue. I saw numerous pictures on The Knot and other wedding websites of brides doing this and I loved it. I bought blue Jolee's crystallized swarovski elements (3mm flat back) at Michael's and used E600 glue to attach them. I first printed the letters onto printer paper and cut them down so they would fit over my shoes. I used a safety pin to poke holes around the letters so it would create a stencil to follow on my shoes. I then glued all the rhinestones down. It wasn't hard at all and didn't take me very long either.
Bridal Party Tanks
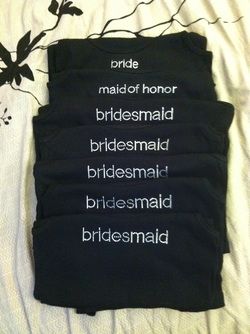
These are tanks that I made for myself and my girls. I bought the tanks at Old Navy when they were on sale for $2. The iron-ons came from consumercrafts.com and were also $2. So the tanks only cost me $4 each! I thought they were a cute idea. We will all wear them when we get ready the day of.

